Intended for Teachers
Microsoft Teams - A Cheat Sheet of everything to do with Teams
Team for Education - Quick Start Guide
Before we begin
Managing student chat.
If you create meetings in a separate channel (eg Meetings) you can better manage student chat.
Managing Class Channel Chat : Pinehurst School - Student ICT Help (freshdesk.com)
Starting a meeting...
Meetings can be scheduled or started on the fly within your class team channel or scheduled.
If your meeting is scheduled make sure you set permissions so that students can not start the meeting on their own.
Option 1 (Usually the least issues): Go to the channel in your team where your meeting is to be held
- Click on meet now

- Name your meeting and check audio/device settings, then join now

- Set meeting Permissions from the three dots - choose Meeting options

- Suggest Settings - Who can Present - Only Me (you can change this on the fly in the meeting if you wish
By default - students will be attendees - you can make them presenters in the Participants pane
New Options:
Allow Mic - you can prevent attendees from unmuting
Allow camera - prevent sharing camera being shown
Record Automatically - Turn this on and your meeting will start recording when you start the meeting - Students will see a Purple bar in the channel and can join the meeting
 If you have set meeting options, students will see the following....
- You can see who has joined the meeting in the participants pane

You can manage participants from the participants pane
Additional Participant Options - three ellipses at top
New Options:
Lock the meeting - No-one else can join the meeting
Manage Permission - Same as meeting options - the web version
Option 2: Schedule a meeting - If you do this, make sure you set the meeting options. Otherwise students will be able to start and continue the meeting without you.
Suggested Options: Who can bypass Lobby > Set to Only You
Change this once you hae started the meeting and at the end of the meeting
During your Meeting
- Turn recording on - if a student is not able to connect, they will be able to review the meeting later - it will be automatically available to them

- Use Spotlight - if you wish to focus on an individual or your self, you can control what appears on the screen - do this from the participants pane
- Mute and unmute participants
- Change view of the meeting from Gallery to Large Gallery to Together Mode
Sharing your Screen - there are a number of options
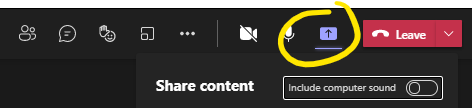

- Include Computer sound
Do this if you plan to show a clip that has audio in it - Screen
Do this if you wish students to see your entire desktop - Window
If you have an application open before you start sharing, you can show just this window - Whiteboard
A collaborative drawing space - works best when using the Whiteboard app - Powerpoint
Open recent powerpoints or browse to a powerpoint.
Before You finish the Meeting
- Stop recording
- End meeting

- Leave
The meeting recording will automatically be processed to Stream and a link created in the Class Teams Channel
Breakout Rooms
Divide your class into small groups for discussion.
PowerPoint Presentation (azureedge.net)
Measuring Student Engagement
Before you finish the meeting:
Download the attendance list (you can not get this once the meeting is finished)

The attendance list will show when participants joined and left the meeting

Insights
After the meeting/all meetings
Depending on the view that you are using in Teams, Insights appears.
If you are using the List view of Teams:
Insights appears at the top of the General Channel
If you are using the Grid View of Teams
Insights appears under the Team name

Note: Students do not see the Insights tab.

Want to get a view across all your classes?
Click on the ellipses in the Teams sidebar
More information at: Class overview page in Insights (microsoft.com)